Quickstart Guide
Usually, there are a lot of steps you need to do before you can train a new computer vision model - gathering data, cleaning data, annotating data, possibly augmenting data, and exporting data in the right format. All of this takes time.
Note: If you are new to computer vision models and model training, read our introductory article.
This quickstart guide is intended to get you up and running and training a license plate detection model right away, so we have simplified the process to 4 steps:
We’ll provide you with a ready-made dataset, in the correct format, so you can focus on training. We’ll guide you through training a license-plate detection model, using a subset of the same dataset we used to train the license plate model in our catalog. And finally, we’ll also walk you through setting up a project, publishing your new model, and testing it out in an application. We’ll finish with a summary and some next steps. Let’s get started!
Step 1: Download the Dataset
Get the dataset here. Move it someplace convenient and note the path.
Note: Make sure you’re logged in!
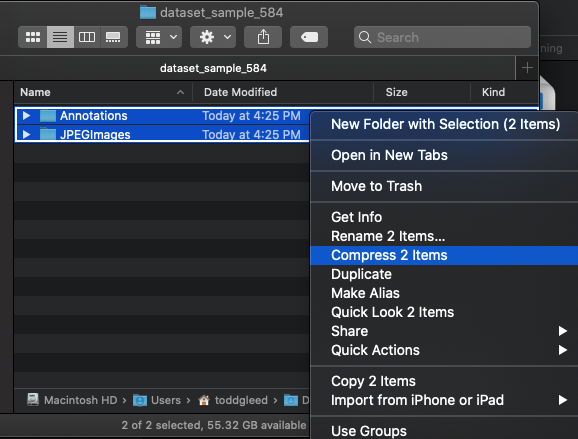
The training tool expects the dataset in the zipped format, so if the browser you use automatically unzips the dataset (e.g. Safari), you are going to have to get it back to the right format. To do this, first locate and open the un-zipped folder dataset_sample_584. You should see two folders: Annotations and JPEGImages. Select both of these folders by highlighting them or CMD-click or CTRL-click. Then right-click and select the option that compresses the folders. The archive that is created is a .zip file in the format you need to train. Use this file in the following steps.
Step 2: Train Your Model
Open the docs for the web and desktop applications in a new tab and follow the steps to train a new model.
Step 3: Use Your Model in a Project
Now the model has been added to your personal account. For more information on how to use models, see this page.
Initialize your app directory by running
mkdir <project_directory> && cd <project_directory>
then configure your app by running
aai app configure
Select the Create new Project option then name your app. It will then show a prompt How would you like to initialize your project?. Choose the as an empty app option.
Press y on the next two prompts until it asks you What is the destination?. Select Your local computer, then select y on one last prompt.
Next, add the model you trained in step 2 by running the below command in the app root directory.
aai app models add <{your username}/{your modelname}>
Open the app.py file in your app directory replace all lines of code in it with the following:
import time
import edgeiq

def main():
    obj_detect = edgeiq.ObjectDetection("alwaysai/mobilenet_ssd")
    obj_detect.load(engine=edgeiq.Engine.DNN)

    fps = edgeiq.FPS()

    with edgeiq.WebcamVideoStream(cam=0) as video_stream, \
                edgeiq.Streamer() as streamer:
        time.sleep(2.0)
        fps.start()

        while True:
            frame = video_stream.read()
            results = obj_detect.detect_objects(frame, confidence_level=.5)
            frame = edgeiq.markup_image(
                    frame, results.predictions, colors=obj_detect.colors)

            text = ["Model: {}".format(obj_detect.model_id)]
            text.append(
                    "Inference time: {:1.3f} s".format(results.duration))
            text.append("Objects:")

            for prediction in results.predictions:
                text.append("{}: {:2.2f}%".format(
                    prediction.label, prediction.confidence * 100))

            streamer.send_data(frame, text)

            fps.update()

            if streamer.check_exit():
                break

        fps.stop()
        print("elapsed time: {:.2f}".format(fps.get_elapsed_seconds()))
        print("approx. FPS: {:.2f}".format(fps.compute_fps()))

if __name__ == "__main__":
    main()
To use your model in the app, replace line 4
obj_detect = edgeiq.ObjectDetection("alwaysai/mobilenet_ssd")
with
obj_detect = edgeiq.ObjectDetection("{your username}/{your modelname}")
Then, Run aai app install and aai app start to run the example app and test the new model output!
You should see a log [INFO] Streamer started at http://localhost:5000, simply paste localhost:5000 into a web browser and you will see your webcam stream. Hold up some images of vehicles and license plates in front of the camera to test how well your model performs.
If your model isn’t performing very well, you can continue training on the web and desktop apps by checking the continue training from previous version checkbox. Just ensure you enter the same model name you trained with before.
Then, run
$ aai app models update
You can then run the app again with the updated model version, and get better inference results.
This model can be used in any object-detection based project. For more information on working with projects, see here.
Summary
The dataset used in this tutorial has 584 images. The rule of thumb is that at least 20 epochs are needed in training a model. Even about two thirds of the way there, the model is already able to detect a fair number of vehicles, and some license plates! Some of the bounding boxes, especially for license plates, are not perfectly centered, but we’re off to a good start in only about 30 minutes.
Train a New Model
Generating a dataset and annotating it are where you will spend most of your time when creating your own models. If you don’t have a dataset yet, follow these steps to generate one:
Check out our documentation on data capture guidelines,
Optionally, use our data generation starter application to generate your dataset, and
Read our guide on data annotation using our annotation tool.
You can make your own dataset from scratch, or you can add images and annotations to the dataset we provided. You would do this to potentially improve the performance of license plate detection model on certain vehicles or plates, or in certain environments.
Repeat the training process you followed in the first stage of this guide using your newly generated dataset.